Showing posts with label DIY. Show all posts

Wednesday, October 03, 2012

Wooden Candle Holders

A piece of wood or two, some candles that need painting, some inspiration for my Thanksgiving table and a new drill bit. Made for an interesting day...

I saw a beautiful candle holder made by another Marty and her husband at Marty's Musings.
Marty's Candle Holder

With all the wood out back for the stove & fire pit I knew I'd find some perfect pieces to do something similar.
I bought a 1 1/2" drill bit which is exactly the right size for the candles. 

When I first started drilling the log, it spun with the bit and my hip stabilized it. Good thing - my hip was there...bad thing - my hip was there, and is now bruised.
One down...five to go

The next hole I decided to use the vise. Duh...why I didn't think of that first, I'll never know.

My log holder finished, just needs touch-ups

I cut different sizes out of another log to make individual tea light holders.
Cutting the log. Shoot, I should have closed the door...yes there is a washroom in the workshop. Handy. 
Notice the first aid kit? Very handy.

Once I had the pieces, it was time to drill holes to hold the tealights.


Then the battery died. Fortunately, we have a spare so I put the dead one on the charger and continued...
Notice anything? 
I started to drill and nothing happened. Took me a few seconds (minutes?) to realize what I forgot to do. 

Then I broke one...I guess it was too short to take the pressure.

Needless to say, I didn't do the other short ones!

At once point the drill wrenched in my hand, moving the vise.
Look how much that sucker moved!

Thank heavens the handle was there to stop the vise from completely turning! 

This being the third oops I decided the rest will wait for Larry to get home. Besides, my thumb and wrist are now too sore to hold the drill. But, I think I got a lot accomplished.
On hold...

My darling husband showed me why the vise moved. He had removed one of the bolts because when he's building the burn boards (part of his business) he needs to swivel the vise when wiring. He said I need to put the bolt back in before doing a project like this. Ok, I knew that...I think.

To be continued...you can see part 2 at Wooden Candle Holders

I'm sharing with:


Sunday, September 09, 2012

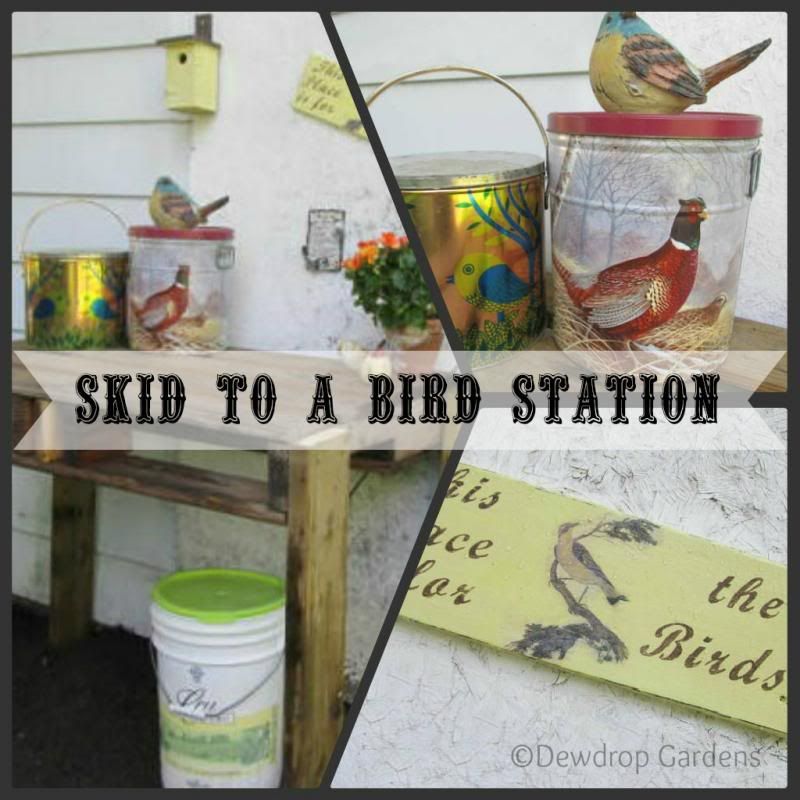
Bird Station from a Recycled Skid

Recycled-skid-to-a-bird-station

I love watching the birds. I've had bird feeders and bird houses for as long as I've had a home to place them. Where we live now has a lot of property and I've had them scattered around. But that can make for a lot of work filling the feeders. So, when we built the fence to keep the chickens out of the courtyard garden, I moved all the feeders to a section that is close enough for me to still watch the birds and accessible for the chickens (they peck and eat the seed that falls to the ground, which keeps the weeds down). But it was still a bit of a distance from where I stored the feed. And, come winter, will be a bit of a pain to drag all the containers out for filling.
 The bird fence

The bird garden with my home made bird bath

I knew what I wanted...a bird station. My husband has a bunch of old skids and a slew of wood out back. I asked him nicely if he could cut one of the skids.

And while he did that, I used the saw to cut the legs. I wanted a tall table to I didn't have to bend over to fill the feeders.

Then I screwed the legs to the skid and voilĂ ! I have a bird station!
Yes, there are a ton of weeds in this section of the property, and what is with that little pot sticking out from under the lean-to? 

I had made a sign that was perfect for this area. I printed out a bird graphic from The Graphics Fairy and using Paint Shop Pro I typed up a bird saying in a cute font. I reversed the words to transfer to a board I had painted.


I painted over this...for some reason I didn't like the way it turned out so I started again.

 And this is what it looks like after I painted the letter transfers and mod podged the bird graphic! I love it. I distressed it to look old, and I just noticed, I still haven't painted the screw heads.
 I actually ended up using a different bird from The Graphics Fairy than the one shown previously.

I have it against the back of the lean-to and added the bird house, feeder and signs. I absolutely love my bird station! It is right beside the 'bird garden'. It's on the north side of the building, I don't have to worry about baking the feed. 
 The large plastic container underneath is the one I use for unshelled peanuts for the jays & chipmunks. 

The large wooden bird was on sale at Zellers. Metal feed containers I got for a song at the thrift store. I toyed with the idea of painting them, but I like the designs on them, they fit the theme. One has mixed bird feed and one is filled with finch feed. I still need to find something to store the suet blocks in. 

 I plan to plant ground-cover underneath the bench.

 My little wooden birds I picked up from work, Walter's Greenhouses, last spring.

This suet sign I picked up at work on sale a few years ago...plus my employee discount. I love shopping at work! 

 This birdhouse, and basket feeder on the wall were also on sale at work.

I love how easy it is to fill my feeders now. The board underneath is where I store a scrubber for the bird baths, and a screwdriver to pry open the smaller tin container (it sticks bad). 

As I find more bird decor, feeders & houses they will get added to this special spot on our property. 

Do you have a specific place to store your bird feed? 


I'm sharing with:


Monday, July 30, 2012

Plants in Peril

We have 6 chickens, and sometimes it seems like a heck of a lot more! The damage they have done in my gardens is not nice...when you consider the time & money spent on them. Love the fresh eggs, but...
Starting to dig & scratch for bugs

My poor Frosted Jade hosta and butterfly bush!

One of the holes dug in a new area of the garden, so much for my glads & lilies :(

And they are having a field day in the woodland garden! Most of the plants have been there for years, but newer ones are in danger from those claws. Not sure what we're going to do about this area...already lost a few. But I'm trying to save my hostas...I collect and love my hostas!
See all those rocks? They uses to be around the cedar tree...that's how strong their claws are! This is a tiny section of that garden...and all the bare spots...used to be filled with plants. :(

Larry suggested putting landscape fabric up as a fence to stop them from coming up to the courtyard area. Yuck! How ugly! I asked how much chicken wire he has left over. Not enough, but it's cheap enough to purchase more. As we discussed this, sitting sipping a cocktail, I noticed an old deck railing I had leaning against the tree. Remembered there were more out back.  A friend had torn down his old deck and brought them over (we get everyone's garbage)...he was going to burn them when I told him no way, they'll be useful one day!
Leaning, waiting for me to decide what to do with it

"Hey Honey, how about that old deck railing? Wouldn't that work, and look a hundred times better?" He jumped up, grabbed the measuring tape and we measured, and measured twice. We had the perfect amount to build a fence across behind the tree!! "Wow," he said, "you are a genius, great idea!" My 'feathers' puffed out in pride. :)

We brought them all forward and the next day he built the fence! I was soooo pleased, he did an awesome job and it looks wonderful! He even built a gate!
Pickle wondering why all the rails are up here.

My wonderful husband started the fence! Look at all the dead grass and poor shrubs...drought and high heat did a number on everyone this summer.

Hard at work. And Pickle bathing...

With the large maple tree, there are large roots. He broke an axe chopping those roots to put the fence poles in. oops


Starting the gate...as you can see, he didn't measure twice to dig the hole. lol

Done!!! 
Brownie & Pandora are confused as to why they can't get to the side garden! lol

With the chickens not being able to venture to where the bird feeders are and scratch around for fallen seed, I decided to move the bird station. And decided the fence would be a perfect place to put my collection of bird houses! The other side of the fence is now my 'bird garden'. :)
See the old bird's nest? I know it won't last long, but it's fun for now! Going to put solar lights on top of the gate posts. (ignore his collection of garbage out back...he keeps promising me it's going...)

 Put the feeding station in the area an old honeysuckle had been, so the ground is perfect for scratching chickens. :)

 You can see some of the birdhouses on the fence

 My nephew gave me this bird house and I love it!

And the old/new bird cage that so far only the chipmunks seem to use.

But we are far from done. Now comes the task of cleaning up & repairing the damage the chickens did. We are getting a load of soil to level out the ground/holes, and then a load of mulch to put in the new gardens I'm adding. And I'm in the process of making stepping stones for the pathway...but that is another post.

I've also made a bird bath out of concrete to add to this bird garden and you can see it in my Home Made Bird Bath post. I love it and so do the birds!


My entry into Terrific Tuesdays @ Adventures of a DIY Mom sponsored by Appliances Online and their best Range Cookers.

I'm linking to:

Carter's Cottage My Monday Muse


LinkWithin

Related Posts Plugin for WordPress, Blogger...