Monday, February 25, 2013

Forcing Spring

Force-an-Early-Spring-with-flowering-branches-and-bulbs

At this time of year, when I'm starting to get fed up with winter, it's wonderful to see some blooms inside. Forcing bulbs and flowering branches is an easy and inexpensive way to get the look of spring.

Cut a selection of branches off shrubs that flower from your yard. Larger branches will need to have their ends cut or hammered to help the water penetrate their thick stems. 
Hammered-stem-endsCut-Stem-Ends

Arrange the branches in vases with fresh water, changing the water every couple of days.
Arrange-the-Branches-in-Vases

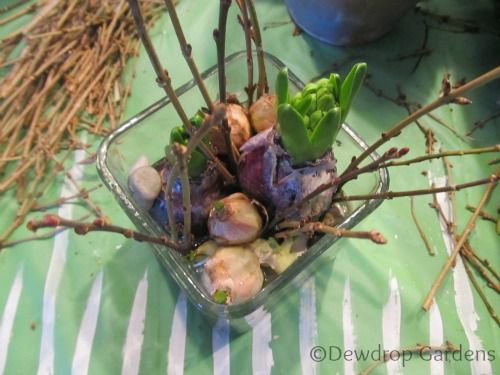
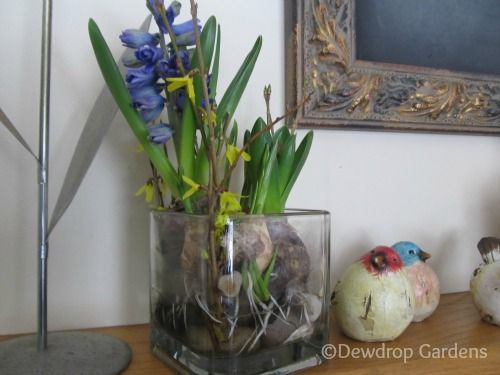
Arrange bulbs in glass containers with rocks on the bottom. Fill with water up to the root end. Add some small twigs from your shrubs with the bulbs. 

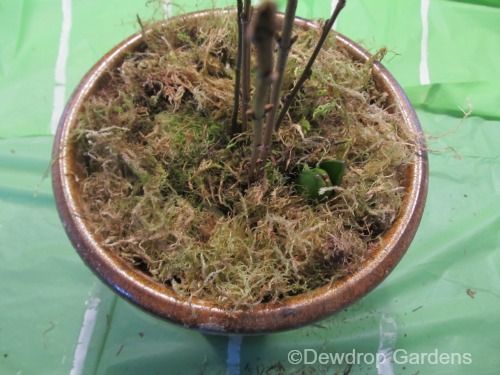
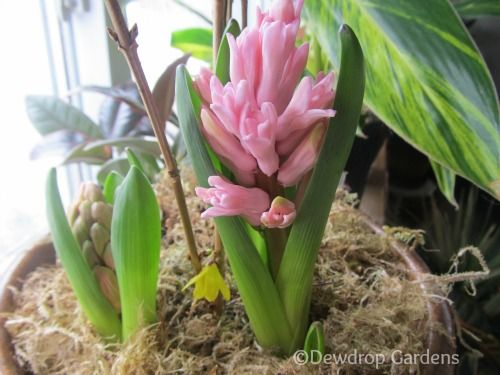
Plant some bulbs in pots and add more twigs. You don't have to plant the bulbs as deep as you would in your gardens, the tips can be just reaching the top of the soil. Add moss or bark chips to the pot for a decorative touch. 

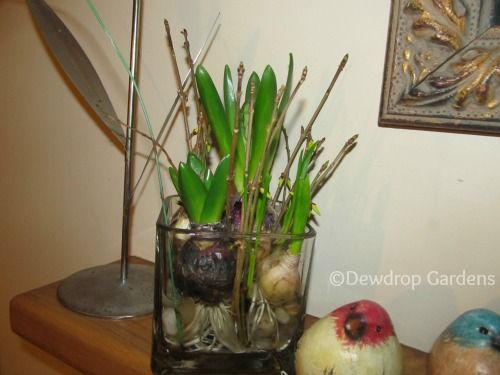
The bulbs are starting to grow! And the branches have buds on them.


The forsythia are blooming in a vase I decorated with burlap and a yellow bow. The pussy willows have not bloomed yet, hopefully in time for Easter. 

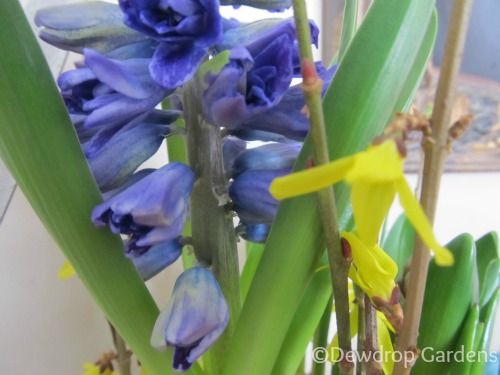
This hyacinth is actually purple. 


A bit of Easter for the spring mantle.


Have you tried forcing bulbs and branches? Don't you love the look of spring when the snow is still piled up outside? I sure do!


I'm sharing with-

                     
It's Party Time!                                                Bouquet of Talent Linky Party

Spring Thing Linky Party


Friday, February 22, 2013

A Stand for My Glue Gun

Home-Made-Glue-Gun-Holder

Did you notice my glue gun in yesterday's post
Craft-Station-Storage

Last week I saw Whitney from Shanty 2 Chic post the glue gun stand she made and I thought she was a genius. I had to make one myself, I was tired of using a plastic plate and having the gun fall over all the time. 

I cut scrap wood pieces to size, pre-drilled the holes, and screwed the pieces together. Then I used my free Pantone paint in Goat to finish it off. 
Painting-Glue-Gun-Stand
Yes, the wood split when I was drilling in the screws. Overkill using a drill for screwing in these small screws.

While I was painting, I added a couple coats to this old mini shelf, since I had the brush going and all. It will go on the crafting bench.
Mini-shelf

And of course, I don't have any during photos. No fear, you can see the full tutorial at Shanty 2 Chic's blog. I can't improve on her instructions!
Glue-Gun-Stand

I didn't have any tile pieces so I ended up painting and gluing on an empty metal tea light. Works for me.
Home-Made-Glue-Gun-Holder
It looks off centre, but it really isn't. 

And I'm storing my glue sticks in a large dollar store votive holder. 
Home-Made-Glue-Gun-Holder

I have to say, I'm loving my new glue gun holder! So simple, yet so effective. 

What do you use to hold your glue gun? Did you make a stand, or buy one, or do like I used to do and set it on whatever is handy?


I'm sharing with:

                                             
Funky Junk Interiors                                                   Power of Pinterest


Thursday, February 21, 2013

My New Crafting Station

Crafting-Station


Last fall, Suzan from Simply Vintageous.......by Suzan had a contest promoting My Color inspired by Pantone. We had to pick 3 colours we loved from Pantone's website, My Color Paints, and comment on her blog. Long story short...I WON!!!
My-Color-Inspired-by-Pantone

I picked three colours I thought would compliment each other since I wanted to use them to redo the furniture in the guest room...but ended up using them on pieces that are going into my new craft room.
Slate Green 16-0713
Whitecap Grey 12-0304
Goat 16-0806
My-Color-Inspired-by-Pantone
They ran out of quart containers for 2 of my colours, so sent me 4 pints in the Whitecap Gray and Goat.

Finally, I have started working on my new craft room! I showed you where I have been crafting in my last post, and now I have completed some key elements. 
Craft-Storage
An old cupboard that I've been using for craft supplies.

The cupboard has been painted using the Whitecap Grey. I had dollar store doilies for stencils, using Slate Green and the words were stenciled using Goat. It looks awesome in the craft room!
Craft-Storage

Craft-Storage-stenciled

We used an old coffee table someone left on our burn pile to make the craft table. With old wood we made the table tall so it is easier to work on. A shelf was added for storage. But, I didn't like it...
Tall-Homemade-Craft-Table
The craft table in it's original spot out in the workshop.

I asked my husband to remove the legs from the coffee table. (can't remember why they were left on)
Homemade-Craft-Table

And I finally got around to painting it, again with Whitecap Gray. 
Homemade-Craft-Table
Moved in the house to the rec room, my new craft room

I had found a dresser & hutch at a garage sale last year for only $10.00. I ended up using the hutch as a shelving unit on top of the craft table. Sorry, I don't have before pictures, but here's one during so you can see what the shelf started like. 
Craft-Shelf

And here it is all together. Can you believe I painted all these in one colour and still have a pint left? The shelf took 3 coats, the cupboard 2 and the table was primed and finished with 2 coats. I love this paint!
Craft-Station

I still have to paint and mount the crib rail so I can hang supplies on it. I have so much more to do, and I'll share with you as I complete them. 
Craft-Station
See the not-quite-done glue gun stand? It has been finished!


Craft-Station-shelf-storage
Did you see where I used to do my crafting? I think this is so much nicer.

Craft-Station
I plan on painting the rocker and making a cushion for it, I want to do it in the 'Goat' colour. 

Stay tuned for more projects on this room. It has a sewing area, another worktop table to be finished in the Slate Green and a large dresser for storage I need to refurbish. And, I still have to paint the walls. You'd think I would get that done first...no idea what I was thinking. I was too excited to get working on the furniture. 
Thanks, Suzan!

Do you do things backwards, too? What is your craft area like? Have you tried the paints from Pantone


I'm sharing with:

                               
Power of Paint Party                                                     Serenity Now


It's Party Time

Wednesday, February 20, 2013

Where I Came From and Where I'm Going

Taking-Over-The-Rec-Room

Warning - There are NO pretty pictures here, just a big mess. :)

I used to do all my crafting out in the games room/workshop. Which is handy because that's where most of the power tools are. But it is also where my husband works his business. 
Workshop-Storage
Views of the different storage & work areas in the workshop. Pretty junky looking, eh? 

Needless to say, sometimes we would be fighting for work space, which is on the pool table. Yes, we use the pool table as a workbench. We have a large piece of plywood we put on top, and if I'm painting I cover it with dollar store tablecloths.
Games-Room-TV-Area
The 'lounge' area in the games room/workshop. Larry likes to watch more than one sport at a time. lol (sorry for the poor picture quality)

This is where I used to have my craft area. It made it difficult when it was time to play darts. That odd looking table under the dart board is made from free 'garbage'. I'll show you what I did with it in the next post. 
Workshop-Craft-Area


Workshop
Looking towards the washroom. I know, I have a few chairs that need recovering. 

Do you think my husband has enough tools? The 'barn' has a lot of the larger drills and saws. Plus many I don't see him use...duplicates maybe? lol
Workshop
This workshop is out by the kennels and chicken coop.

Recycled-Wood
Look at all that old lumber I can use!!

This is the rec room in the house. It is never used unless the family stays over, then a few will sleep down here. Wasted space that I wanted to change. 
Rec-Room
View from the stairs

Sewing-Area-in-Rec-Room
Sewing & ironing area

Rec-Room
Sleeping quarters (the wardrobe is not staying)

Rec-Room
Looking towards the new craft station area.

This nook where all the junk is will be outfitted with shelving for more storage. The TV will be moved. 
Rec-Room
The cold cellar is on the other side of the door. 

Rec-Room
The dresser will be refurbished and hold craft supplies. 

I have my work cut out for me. Lots to do to get this area set up for crafting & sewing. But I'm having so much fun setting it up just the way I want it...my own personal space. I'll be showing you how it's progressing in future posts. 

Where do you do your crafting? Do you like using power tools? 


I'm sharing with:

livelaughlinky 250x250


LinkWithin

Related Posts Plugin for WordPress, Blogger...